Showing posts with label shortbread. Show all posts

Thursday, June 3, 2010

Herbal Dynasty Chai Scottish Shortbread

The time has come. I've infused my butter, and now I get to make tea treats!! First up: shortbread cookies. These seemed like the perfect first foray into tea-infused treats. (Don't worry, I have big plans for cupcakes too!) So, I went through my tea selection and pulled out my Herbal Dynasty Chai from Sereneteaz . This is a really delicious, light chai made with roobios tea, ginger, cardamom, cinnamon & vanilla. It's almost floral, and a good introduction for the non-chai drinkers out there.

I'm pleasantly surprised how these turned out since I've never fully adapted a recipe for myself before. But, they have an excellent, delicate texture with a sweet, tea flavor. I'm thinking over the next couple days the tea flavor will become slightly more pronounced, but it unfolds nicely in your mouth as you eat the cookie. I would like to try this with some other tea varieties.

Tea-Infused Scottish Shortbread
recipe adapted from The Joy of Cooking 75th Anniversary Cookbook

Prep Time:
10 minutes (plus time to infuse the butter with tea)
Total Time: About 1 hour
Yields: 24 - 2" x 1" bars

Ingredients
  • 3/4 Cup (1 1/2 sticks) tea-infused butter, softened
  • 1/4 cup powdered sugar
  • 1/4 cup granulated sugar (plus 1 to 2 tsp, reserved for later)
  • 1/4 tsp salt
  • splash of good-quality vanilla extract
  • 1 1/2 cups flour
Directions
  1. Preheat oven to 300 degrees F.
  2. In a large bowl, beat together butter, powdered sugar, 1/4 cup granulated sugar, salt & vanilla.
  3. Gently stir-in the all purpose flour.
  4. Lightly knead the mixture until it is well blended.
  5. Press the dough evenly into the bottom of an ungreased 8-inch square baking pan. Pierce the dough deeply with a fork all over in a decorative pattern. Then sprinkle with 1 to 2 tsp of sugar.
  6. Bake until the shortbread is lightly browned and darker at the edges, 45 to 50 minutes.
  7. Immediately cut into bars while still warm, then cool in the pan or on a rack.

Enjoy!!

Monday, April 26, 2010

Becky's Famous Lemon Bars

Apparently I'm known throughout the land (or at least the NYC theater community that I've worked with) for my lemon bars. It's a little embarrassing, in fact. I have stories. And am sometimes sold-out by colleagues and friends, and then I have to arrive with lemon bars in hand.

But seriously, what's not to love about an amazing lemon bar? A nice, crunchy shortbread crust. A tangy, yet sweet, creamy lemony middle...I want a lemon bar and cup of tea just thinking about it!

Okay, so you want the secret to my success? Well...maybe I won't give you that. But I will show you the recipe I use!

Lemon Bars
adapted from Paul Deen's recipe
Prep time: about 15 minutes
Cook time: 40-50 minutes
Total time: about 1 hour (plus cooling time)
Yields: 24 large or 48 small bars

Ingredients

CRUST:
  • 1 cup (2 sticks) unsalted butter, melted
  • 2 cups all-purpose flour
  • 1 cup powdered (confectioner's) sugar
  • 1/8 tsp salt
LEMONY GOODNESS (ie...FILLING)
  • 6 eggs
  • 3 cups granulated sugar
  • 3 TBS grated lemon zest
  • 1/2 cup fresh lemon juice
  • 1 cup all-purpose flour
  • Additional powdered sugar for dusting
Directions
  1. Preheat the oven to 350 degrees F. Spray a 9x13 pan with vegetable oil cooking spray.
  2. Make the crust: Combine the butter, flour, powdered sugar and salt in a bowl. Mix with spoon or fingers until well combined. Shape into a ball and pat evenly into the bottom of the prepared pan. Bake for 15 to 20 minutes, until the crust is set and just beginning to brown.
  3. Make the filling: While the crust is baking, using an electric mixer at medium speed, beat together the eggs, granulated sugar, lemon zest, lemon juice and flour.
  4. Pour over the baked crust and bake for another 30 to 35 minutes, until golden brown and crusty on top.
  5. Let cool completely, then sift powdered sugar over the top.
  6. Cut, then cover with plastic wrap and refrigerate until serving.
**NOTE** It's important to make sure to let this fully set before taking them out of the pan and serving, otherwise they will be runny.

Enjoy!!!

Sunday, December 20, 2009

Espresso-Chocolate Shortbread Cookies

If I could live off of these...I would. But I would be a very fat lady then. So...I just make these occasionally. They are easy to whip up, but do take a little bit of pre-planning as the dough needs to set AT LEAST 2 hours prior to baking. That said, you can whip it together one day, and bake them the next if you are time challenged.

Matt and I were coming up with the cookie list for this holiday season (I promised to do up a bunch of cookies for him to take into work) and this made the list. Try them at the holidays, or any time. Perfect to take to a housewarming, eat with a nice cup of joe or just a little treat for yourself!

Espresso-Chocolate Shortbread Cookies
courtesy of Smitten Kitchen

Prep time: about 20 minutes

Inactive prep time: 2 hours

Cook time: 18 - 20 minutes

Total time (including resting of the dough): 2 hours 40 minutes

Yields: 32 cookies

Ingredients

  • 1 tablespoon instant espresso powder
  • 1 tablespoon boiling water
  • 2 sticks (8 ounces) unsalted butter, at room temperature
  • 2/3 cup confectioners’ sugar
  • 1/2 teaspoon pure vanilla extract
  • 2 cups all-purpose flour
  • 4 ounces bittersweet chocolate (plain, or a toffee variety), finely chopped, or 3/4 cup store-bought mini chocolate chips
  • Confectioners’ sugar, for dusting (optional)

1. Dissolve the espresso in the boiling water, and set aside to cool to tepid.

2. Working with a stand mixer, preferably fitted with a paddle attachment, or with a hand mixer in a large bowl, beat the butter and confectioners’ sugar together on medium speed for about 3 minutes, until the mixture is very smooth. Beat in the vanilla and espresso, then reduce the mixer speed to low and add the flour, mixing only until it disappears into the dough. Don’t work the dough much once the flour is incorporated. Fold in the chopped chocolate with a sturdy rubber spatula.
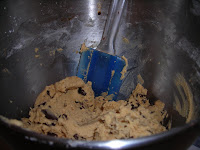
3. Using the spatula, transfer the soft, sticky dough to a gallon-size zipper-lock plastic bag. Put the bag on a flat surface, leaving the top open, and roll the dough into a 9 x 10 1/2 inch rectangle that’s 1/4 inch thick. As you roll, turn the bag occasionally and lift the plastic from the dough so it doesn’t cause creases. When you get the right size and thickness, seal the bag, pressing out as much air as possible, and refrigerate the dough for at least 2 hours, or for up to 2 days.

4. Position the racks to divide the oven into thirds and preheat the oven to 325 degrees F. Line two baking sheets with parchment or silicone mats.

5. Put the plastic bag on a cutting board and slit it open. Turn the firm dough out onto the board (discard the bag) and, using a ruler as a guide and a sharp knife, cut the dough into 1 1/2-inch squares. Transfer the squares to the baking sheets and carefully prick each one twice with a fork, gently pushing the tines through the cookies until they hit the sheet.

6. Bake for 18 to 20 minutes, rotating the sheets from top to bottom and front to back at the midway point. The shortbreads will be very pale–they shouldn’t take on much color. Transfer the cookies to a rack.

7. If you’d like, dust the cookies with confectioners’ sugar while they are still hot. Cool the cookies to room temperature before serving.


Enjoy!